AlminでFluxアーキテクチャをやってみる
AlminでFluxアーキテクチャについてを見ていく話です。
AlminはいわゆるFluxライブラリ的なものですが、ドメイン駆動設計(DDD)を行うにあたって既存のReduxやFluxでは上手くレイヤー分けをやりにくい部分がありました。
この辺の経緯については以前スライドやドキュメントにまとめてあるので、以下を参照してください。
この記事では、実際のサンプルコードを見ていきながら、Flux的なデータフローについて見ていきます。
Alminでカウンターアプリを作る
このサンプルではAlminを使って次のようなカウンターアプリを作っていきます。

次に英語のチュートリアルもあるので参照してください。
Source Code
ソースコードは次の場所にあります。
git clone https://github.com/almin/almin.git

cd almin/example/counter
npm install
npm start
# manually open
open http://localhost:8080/
ディレクトリ構造
最終的なディレクトリ構造を最初に見ておくとイメージがしやすいかもしれません。
データの流れとしては、Component -> UseCase -> Storeとなりますが、実装の順序はこの順序じゃなくても問題ありません。
src/
├── index.js
├── component
│   ├── App.js
│   └── Counter.js
├── usecase
│   └── IncrementalCounterUseCase.js
└── store
    ├── CounterState.js
    └── CounterStore.js
Alminの構成要素についてはComponent of Alminを参照してみてください。
このサンプルでは、最小限の要素のみが登場しています。
- View
- ユーザーが自由に選ぶ
- ここではReactを選択
- Store
- アプリの状態(State)を保存する
- Stateが変わったことを(Viewへ)通知する
- UseCase
- ユーザーが行いたい処理の流れを書く場所
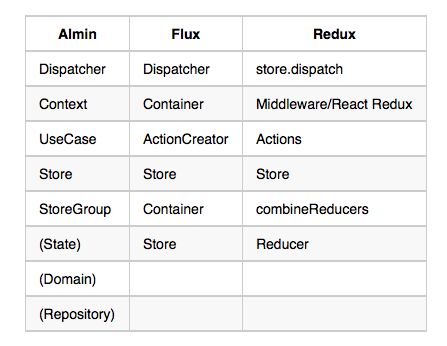
他のライブラリと見比べてみると次のような形になります。

このサンプルは状態が1つしかないため、複数のStoreをまとめるStoreGroupや、 ロジックが殆どないためDomainといった要素は登場していません。
カウンターの機能
- ユーザーがボタンを押したら+1する
以上。
つまり、このカウンターは「ユーザーがボタンを押したら+1する」というUseCaseがあります。
UseCase
カウンターの機能をUseCaseという形で実装します。 UseCaseとは、ユーザーとシステムのやり取りを対話的に書いたものです。
簡単にいえば、ユースケースにはユーザーがシステムとやり取りする手順を書いていきます。 カウンターの例では複雑な手順が出てこないため、ユーザーがUIを操作した時に行うアクションを書く場所と考えれば問題ありません。
- ボタンを押したら+1する
基本的にAlminでは1 UseCase 1ファイル(クラス)として実装します。
これを実現するIncrementalCounterUseCase.jsを作成します。
AlminのUseCaseクラスを継承し、execute()メソッドに行いたい処理実装します。
"use strict";
import { UseCase } from "almin";
export default class IncrementalCounterUseCase extends UseCase {
    // UseCase should implement #execute method
    execute() {
        // Write the UseCase code
    }
}
ここで行いたい処理というのは、カウンターを+1することです。
つまり、IncrementalCounterUseCaseが実行されたときに、CounterアプリのStateを更新したいわけです。
そのためには、まずCounterアプリのStateを保持する場所が必要です。 ここでは、CounterアプリのStateをStoreという入れ物の中に実装します。
Store
まずは、CounterStoreというStoreクラスを継承したものを作成します。
"use strict";
import { Store } from "almin";
export class CounterStore extends Store {
    constructor() {
        super();
        // receive event from UseCase, then update state
    }

    // return state object
    getState() {
        return {
            count: 0
        };
    }
}
AlminのStoreはUseCaseからdispatchされたpayloadを受け取ることができます。
つまり次のような流れを実装します。
- IncrementalCounterUseCaseが”increment” payloadをdispatchします
- CounterStoreは”increment” payloadを受け取り、自分自身のstateを更新します
これはいわゆるFluxパターンです

Fluxでは次のような説明になります。
- ActionCreatorで”increment” actionを作りdispatchします
- CounterStoreは”increment” payloadを受け取り、自分自身のstateを更新します
UseCase dispatch -> Store
IncrementalCounterUseCaseに話を戻して、「“increment” payloadをdispatch」を実装します。
"use strict";
import { UseCase } from "almin";
export default class IncrementalCounterUseCase extends UseCase {
    // IncrementalCounterUseCase dispatch "increment" ----> Store
    // UseCase should implement #execute method
    execute() {
        this.dispatch({
            type: "increment"
        });
    }
}
UseCaseクラスを継承したクラスはthis.dispatch(payload)メソッド利用できます。
payloadオブジェクトはtypeプロパティを持ったオブジェクトです。
次のpayloadは最小のものといえます。
{
    type: "type";
}
次のようにtype以外のプロパティも持たせることができます。
{
    type : "show",
    value: "value"
}
つまり、先ほど実装したIncrementalCounterUseCaseは、"increment"いうtypeのpayloadをdispatchしています。
UseCase -> Store received
次はCounterStore が “increment” payloadを受け取れるようにします。
Storeクラスを継承したクラスは、this.onDispatch(function(payload){ })メソッドが利用できます。
import { Store } from "almin";
export class CounterStore extends Store {
    constructor() {
        super();
        // receive event from UseCase, then update state
        this.onDispatch(payload => {
            console.log(payload);
            /*
            {
                type: "increment"z
            }
            */
        });
    }

    getState() { /* stateを返す */ }
}
Store#onDispatchメソッドで、UseCaseがdispatchしたpayloadを受け取れます。
受け取ったらCounterStoreのstateをアップデートします。
その前に、Alminでは多くの場合StoreがStateを別々のクラスとして実装しています。
つまり、CouterStoreはCounterStateのインスタンスをもつという形にしています。
Store
- dispatchや変更を監視、Stateを保持する層
State
- ステート!
State
まずはCounterState.jsを作成します。
State自体はただのJavaScriptで、AlminとしてStateのようなクラスは提供していません。
CounterStateの目的は
- “payload”を受け取り、新しいStateを返す
export default class CounterState {
    /**
     * @param {Number} count
     */
    constructor({ count }) {
        this.count = count;
    }

    reduce(payload) {
        switch (payload.type) {
            // Increment Counter
            case "increment":
                return new CounterState({
                    count: this.count + 1
                });
            default:
                return this;
        }
    }
}
このパターンはどこかで見たことがあるかもしれません。 Reduxの reducer と呼ばれるものによく似たものを実装しています。
Store -> State: NewState
最後に、CounterStoreへStateを更新するコードをを追加したら完成です。
- dispatchされたpayloadを受け取り、
CounterStateを更新を試みます - もし
CounterStateが更新されたなら,CounterStore#emitChangeを叩き変更を通知します getState(){}ではStateのインスタンスを返します
Storeを継承したクラスはthis.emitChange()メソッドを持っています。
これは、Storeを監視しているもの(主にView)に対して、Store(State)が変わったことを通知しています。
"use strict";
import { Store } from "almin";
import CounterState from "./CounterState";
export class CounterStore extends Store {
    constructor() {
        super();
        // initial state
        this.state = new CounterState({
            count: 0
        });
        // receive event from UseCase, then update state
        this.onDispatch(payload => {
            const newState = this.state.reduce(payload);
            if (newState !== this.state) {
                this.state = newState;
                this.emitChange();
            }
        });
    }

    getState() {
        return this.state;
    }
}
Side note: Testing
UseCase、Store、Stateと分かれているのでテストも書くのは簡単です。 次の場所にテストコードもあります。
View Integration
ここでは、Viewの例としてReactを使っています。
App
App.jsというコンポーネント、いわゆるContainer Componentを作成します。
次にContextオブジェクトを作成します。
ContextオブジェクトとはStoreとUseCaseを繋ぐ役割をするものです。
次のように、StoreのインスタンスとDispatcherのインスタンスを渡して初期化しています。
ここではStoreが1つのみですが、Alminでは複数のStoreをまとめるStoreGroupというものも用意しています。
StoreGroupには { State名: Store } というように対応関係のマッピングオブジェクトを渡します。
StoreGroup#getStateで { State名: Store#getState()結果 }が取得できます。
import { Context, Dispatcher } from "almin";
import { CounterStore } from "../store/CounterStore";
// a single dispatcher
const dispatcher = new Dispatcher();
// a single store. if you want to use multiple, please use StoreGroup!
const store = new CounterStore();
// StoreGroupを
const storeGroup = new StoreGroup({
    // stateName : store
    counter: store
});
const appContext = new Context({
    dispatcher,
    store: storeGroup
});
"use strict";
import React from "react";
import { Context, Dispatcher } from "almin";
import { CounterStore } from "../store/CounterStore";
// a single dispatcher
const dispatcher = new Dispatcher();
// a single store
const store = new CounterStore();
const appContext = new Context({
    dispatcher,
    store
});
import Counter from "./Counter";
export default class App extends React.Component {
    constructor(...args) {
        super(...args);
        this.state = appContext.getState();
    }

    componentDidMount() {
        // when change store, update component
        const onChangeHandler = () => {
            return requestAnimationFrame(() => {
                this.setState(appContext.getState());
            });
        };
        appContext.onChange(onChangeHandler);
    }

    render() {
        /**
         * Where is "CounterState" come from?
         * It is a `key` of StoreGroup.
         *
         * ```
         * const storeGroup = new StoreGroup({
         *   "counter": counterStore
         * });
         * ```
         * @type {CounterState}
         */
        const counterState = this.state.counter;
        return <Counter counterState={counterState}
                        appContext={appContext}/>;
    }
}
App.jsを見てみると、
appContext.onChange(onChangeHandler);
これは、CounterStore が変更される(emitChange()を叩く)とonChangeHandlerが呼ばれることを意味しています。
そして、onChangeHandler はApp componentのState(ReactのState)を更新します。
Counter component
後は、counterStateをCounterComponent(実際にcountを表示するView)が受け取り、カウントの値を表示すれば完成です。
カウントを更新したい場合は、作成したIncrementalCounterUseCaseをcontext.useCase(new IncrementalCounterUseCase()).execute(渡したい値);で呼び出すことができます。
context.useCase(new IncrementalCounterUseCase()).execute();
"use strict";
import React from "react";
import IncrementalCounterUseCase from "../usecase/IncrementalCounterUseCase";
import { Context } from "almin";
import CounterState from "../store/CounterState";
export default class CounterComponent extends React.Component {
    constructor(props) {
        super(props);
    }

    incrementCounter() {
        // execute IncrementalCounterUseCase with new count value
        const context = this.props.appContext;
        context.useCase(new IncrementalCounterUseCase()).execute();
    }

    render() {
        // execute UseCase ----> Store
        const counterState = this.props.counterState;
        return (
            <div>
                <button onClick={this.incrementCounter.bind(this)}>Increment Counter</button>
                <p>
                    Count: {counterState.count}
                </p>
            </div>
        );
    }
}
CounterComponent.propTypes = {
    appContext: React.PropTypes.instanceOf(Context).isRequired,
    counterState: React.PropTypes.instanceOf(CounterState).isRequired
};
これにより、一般的なFluxの一方こうのデータフローが次のようにできていることが分かります。
- React -> UseCase -> Store(State) -> React
Alminとロガー
Alminはアプリケーションのログをキチンと取れるようにするという設計の思想があります。
そのため、ContextにはAlminがやっていることを通知するイベントがあり、これを利用して殆どのログがとれます。
almin-loggerという開発用のロガーライブラリが用意されているので、これを先ほどのサンプルに入れて動かしてみます。
3行追加するだけで次のような、UseCaseの実装やそのUseCaseによるStoreの変更などがコンソールログとして表示されます。
import ContextLogger from "almin-logger";
const logger = new ContextLogger();
logger.startLogging(appContext);
また、Reduxを使ったことがある人はRedux DevToolsというブラウザ拡張で動く開発者ツールを使ったことがあるかもしれません。
この拡張実は任意のFluxライブラリと連携するAPIも公開されています。
Alminではalmin-devtoolsを使うことで、 Redux DevToolsと連携できます。
ブラウザにRedux DevToolsをインストールします。
- Chrome: Chrome Web Store;
- Firefox: Mozilla Add-ons;
- Electron:
electron-devtools-installer
そして、3行加えるだけで、AlminのログをRedux DevToolsで見ることができます。(タイムマシーンデバッグなどはアプリ側でちゃんと実装しないと動かないので制限があります)
import AlminDevTools from "almin-devtools";
const logger = new AlminDevTools(appContext);
logger.connect();
この辺のログ取ることによる開発時のメリットなどについては次の文章でまとめてあります。
おわりに
Alminで簡単なカウンターアプリを作成しました。
この例では典型的なFluxのパターンをAlminで行えていることが分かります。

実際のアプリケーションでは、StoreやUseCaseが1つだけというものはあまりないと思います。 TodoMVCの例では、CQRSやドメインモデルなどの要素も登場し、複数のUseCaseを実装していきます。
Alminは元々ある程度複雑になるであろうアプリケーションのために作成しています。 ただし、複雑なアプリケーションの開発を支えるのは設計や開発方法が主で、ライブラリはその一部分に過ぎません。
そのため、小さく使おうと思えばfacebook/fluxやReduxなどと使い勝手はそこまでは代わりません。 設計思想としてアプリケーションが大きくなることを前提としているので、 大きくなってきた時のレイヤリングのしやすさやログなど開発の補助の充実に力を入れています。
どれだけ短く書けるかよりも、どれだけ読みやすく書けて管理できるかの方がメインといえるかもしれません。
この辺の話は、次のスライドやリポジトリを見てみるとよいかもしれません。
お知らせ欄
JavaScript Primerの書籍版がAmazonで購入できます。
JavaScriptに関する最新情報は週一でJSer.infoを更新しています。
GitHub Sponsorsでの支援を募集しています。

