

Service Workerが更新されたことを通知する更新ダイアログを出すライブラリを書いた
service-worker-updatefound-refresh-dialogという読み込むだけで、よくみるService Workerの更新ダイアログを出すライブラリを書きました。
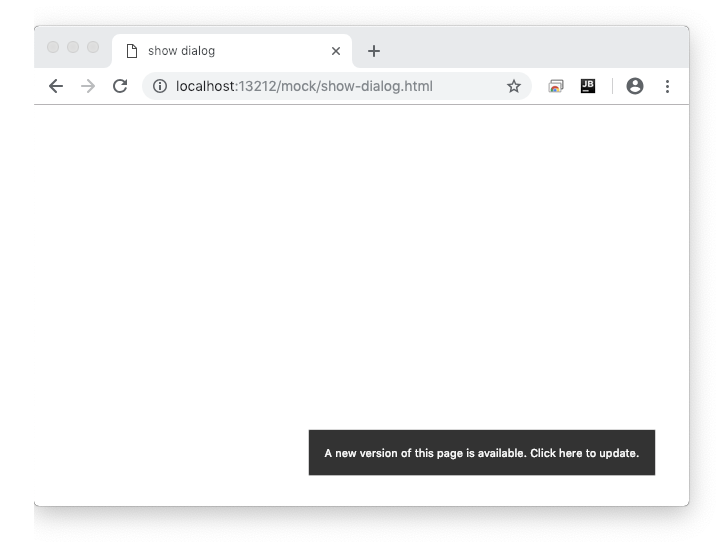
ロードすると、Service Workerが更新されたときにページをリロードするための更新ダイアログを出すだけのライブラリです。
使い方
ページとService Worker内の2箇所でそれぞれスクリプトをロードする必要があります。
- Page:
index.html - Service Worker:
sw.js
UNPKGを経由して、スクリプトを配布していますが最新のバージョンはREADMEを参照してください。
index.htmlでは次のようにスクリプトを読み込み、serviceWorkerUpdatefoundRefreshDialog.register(registration);で処理を登録します。
<!DOCTYPE html>
<html lang="en">
<head>
    <meta charset="UTF-8">
    <title>Example</title>
</head>
<body>
<script src="https://unpkg.com/[email protected]/dist/service-worker-updatefound-refresh-dialog.umd.js"></script>
<script>
    window.addEventListener('load', function() {
        navigator.serviceWorker.register('/sw.js')
            .then(function(registration) {
                serviceWorkerUpdatefoundRefreshDialog.register(registration);
            });
    });
</script>
</body>
</html>
sw.js(Service Workerスクリプト)からはimportScriptsを使って、Worker内で動くスクリプトを読み込みます。
(URLはどっちも同じです)
// sw.js
importScripts("https://unpkg.com/[email protected]/dist/service-worker-updatefound-refresh-dialog.umd.js");
あとは、Service Workerが更新されたらときに、自動的にページ内に更新用のダイアログが表示されます。
設定
message: 表示するメッセージonClick: ダイアログをクリックしたときの処理forceUpdate: デバッグ用、強制的にUIをだす
カスタムメッセージの例
window.addEventListener('load', function() {
    navigator.serviceWorker.register('/sw.js')
        .then(function(registration) {
            serviceWorkerUpdatefoundRefreshDialog.register(registration, {
                message: "Custom Message"
            });
        });
});
スタイル
スタイルはCSSのカスタムプロパティを使って外から指定できるようになっています。
:root {
  min-width: var(--sw-updatefound-refresh-dialog--min-width, 250px);
  color: var(--sw-updatefound-refresh-dialog--color, #fff);
  background-color: var(--sw-updatefound-refresh-dialog--background-color, #333);
  text-align: var(--sw-updatefound-refresh-dialog--text-align, center);
  border-radius: var(--sw-updatefound-refresh-dialog--border-radius, 2px);
  padding: var(--sw-updatefound-refresh-dialog--padding, 16px);
  position: var(--sw-updatefound-refresh-dialog--position, fixed);
  z-index: var(--sw-updatefound-refresh-dialog--z-index, 1);
  left: var(--sw-updatefound-refresh-dialog--left, initial);
  right: var(--sw-updatefound-refresh-dialog--right, 5%);
  top: var(--sw-updatefound-refresh-dialog--top, initial);
  bottom: var(--sw-updatefound-refresh-dialog--bottom, 30px);
}
次のように、スタイルタグで定義を追加すれば、それが優先して使われます。
<style>
    :root {
        --sw-updatefound-refresh-dialog--left: 0;
    }
</style>
作った経緯
VuePressとかでも見る典型的な更新ダイアログを実装してみたくて作って見ました。
実装は以下を参考にしています。
- deanhume/pwa-update-available: Service Workers - New Update Available sample
- How to display a “new version available” of your Progressive Web App
これだけのライブラリでも結構Service Workerのライフサイクルを理解しないと上手く動かない感じでした。
- Understanding service worker life cycle - Vipul Nema - Medium
- Service Worker Lifecycle
- 中級者向け Service Worker Tutorial | blog.jxck.io
Service WorkerのテストはCypressを使ってE2Eテスト的に書いています。
CypressはElectronとChromeを選択できますが、Electronだと上手く動かなくてChromeを使った気がします。 実際にページにアクセスしてunregister -> registerしたりする感じで動かしています。
Service Workerを扱うときはWorkboxを使うことが多いですが、こういうライブラリを書いてみると学びがある気がします。
お知らせ欄
JavaScript Primerの書籍版がAmazonで購入できます。
JavaScriptに関する最新情報は週一でJSer.infoを更新しています。